
Be sure to check the SMART Resources page at the left. Use the custom Google search engine there to find specific SMART Notebook resources.
Easy Steps to Get Going!
SMART Board Basic #1
Remember to orient your board once a day, or more if either your board or projector are mobile. Here's the simplest way:

- Simultaneously hold down both of the buttons on the pen tray. In a second or two the orientation screen will appear.
- You can orient with a pen or your finger (or whatever you happen to have handy--paintbrush, pencil eraser . . . you get the point).
- Touch each of the plus signs in the order they appear. You can either just gently poke the center of the plus sign (if you have reliable aim), or drag your finger to the center and release. Remember that it doesn't matter where you first touch the board when orienting. The board detects your release point only.
The default 9-point orientation screen is recommended by SMART, but you can make adjustments if you are so inclined.
- Click on the Smart Board Tools icon in your dock, and from the Open menu select Control Panel.
- Select Smart Hardware Settings, and from the drop down menu select Orientation/Alignment Settings.
- You can choose 4, 9 12 or 20 point alignment.
SMART Board Basic #2
Have you discovered the amazing "magic pen" tool? It has three basic functions.
- It writes with disappearing ink! This can be a wonderful tool that does double duty as a timer. Try writing the numbers from 10 to 1 on the board. Tell your students that they have until the numbers disappear to get quiet, or back to their seats, or whatever. It works, and it's fun!
- If you use the magic pen to draw a circle or oval on the board, it becomes a spotlight tool. Everything outside of the circle is blacked out so only what is inside is clearly visible. Press the green dot to get back to full screen.
- If you use the magic pen to draw a square or rectangle, it becomes a magnifier. Both the spotlight and magnifier are movable and sizable.
Make friends with your magic pen--you'll be glad you did!
SMART Board Basic #3

Do you remember your box of 64 Crayola crayons from grade school? If you picked up the green crayon, you could color something green. Duh. That was reality in Kindergarten. If you have a Smart board though, you have to start getting used to a whole new reality. In other words, the green pen doesn't always write in green. (Sometimes your finger does!) The SMART reality is that sometimes the green pen writes in blue, or red, or yellow, or even a whole rainbow of colors all at once.
The truth is that the color of the pen is your hand really doesn't have any significance at all. The color of the digital ink that will appear on your board depends not on the color of the pen in your hand, but on which color pen tray is empty. If more than one tray is empty, whichever color was picked up last will be the color in use. You could also select the pen icon from the toolbar, and write in yellow "highlighter" with your finger, without having physically picked up a pen at all.
Whichever of the pen tools you choose to write with, you will be adding digital ink to your board. Use the eraser tool just as you would expect to get rid of digital ink. (If you've added an image or other object to your board, however, the eraser tool will not remove any of those. Objects not created with digital ink must be removed by using the down-arrow that appears after the object is selected, and scrolling to "Delete Object.")
Quick Tip: If you need to erase a large area of digital ink, use the eraser to draw a circle around the area and tap once inside. Poof! All digital ink in the circle will disappear.
SMART Board Basic #4
Smart boards and math lessons go together like peaches & cream, peanut butter & jelly, green eggs & ham . . . Wacław Sierpiński & π day. They're a complementary combination where each component is lovely alone, but so much better together.
Your Smart board is a wonderful tool for teaching math, for many reasons that we'll explore during the year. Here's just one.
Like every good math teacher, you begin the lesson by doing a sample problem on the board, being careful to work neatly, in straight lines and maybe even varying colors for emphasis. Later, you may want to have your students come to the board and try similar problems, following your sample. If you leave your board in single page view, your student will need to either simply remember how you did the problem, or flip back and forth between your sample page and the current work page. Neither seems very efficient. The best option? Choose the
 |
dual page view from your tool bar to see both pages at once!
Okay, so student volunteer #1 can see your sample problem, and complete a similar problem on the next page. What happens when student volunteer #2 comes to the board? How do you add a new page for student work, without removing your carefully worked sample? Pin your sample page in place, and only the student page on the right of the screen will advance.

The "pin" tool is not one of the default Notebook tools, however, so you will have to add it to your toolbar. Under the View menu, scroll to Customize Toolbar. Find the "Pin Page" tool and drag it to your toolbar at the top of the page, and then press the "Done" button at the bottom, right. Now, with the left page of the dual display selected, just click on the pin tool. Your sample page is now pinned in place, so that every student who comes to work on the board will be able to follow your example.
SMART Board Basic #5
Ask the average Joe to draw a line, and you'll get something slightly different than what you'd get if you asked a Geometry teacher to do the same. Insignificant difference, you may think, but to the Geometry teacher, including those arrows on the ends makes a big difference. The smart people at SMART have not only made it possible for you to draw a straight line that's actually straight, but have also made it easy to customize your line so you get exactly what you want.
Choose the line tool from your toolbar and you will be offered several choices.

 But, what can you do if there isn't one that is just right? Go to the Properties Tab and design exactly what you need. You can choose the color you want, the line thickness and style (dotted or solid) and the design of the start and end of your line (dots or arrows). The Properties Tab can also be used to customize shapes as well as text. As a matter of fact, the Properties Tab will let you change the default text styles available by clicking the text icon in your toolbar. Interested? It's easy. Click on the text tool, and then on one of the default text styles. Now go to the Properties Tab and change the font, size, style, etc. When you have exactly what you want, go to the bottom right of your screen, and click on Save Tool Properties. You now have a new default text style. Isn't it nice to get exactly what you want?
SMART Board Basic #6
Occasionally, when I'm at the end of a lesson, I want to point out extension activities or related links posted on my school webpage. The Smart board Keyboard feature makes that easy to do, without having to run over to the computer. If you find yourself in the same position, give this a try.
Go to your Dock to access your Internet browser. Once your homepage opens, click in the address bar to highlight the URL of the homepage. (You may actually have to double or triple click, depending on which browser you're using.) Now, press the keyboard button on the pen tray of your Smart board. When the keyboard appears, use it to type the new URL in the address bar, and press return.

Now, if you're like me, and have trouble with the rather small keys of the on-screen keyboard, be sure to click on the green + in the upper left corner to enlarge the keyboard to full size. You can also use the drop down menu to change from the classic keyboard to the simple keyboard, if you are working with primary students. (The simple keyboard shows the keys in alphabetical order.) Also, be sure to check the Settings button, to turn the sound on or off (choose from Click or Speech), and adjust the transparency of the keyboard.


SMART Board Basic #7
Very often, when you insert a clipart image from the Internet into a Notebook file, the image comes with some white background attached. Unnoticeable if you put it on a white page, but really annoying if you want to use it on a page with a background color other than white. Luckily, many computer programs, including Notebook, now come with a feature for eliminating the white space around the image. Here's what you can do:
Use the Insert menu to choose the picture file you want to insert. While the image is selected, use the drop-down menu to access Picture Transparency.


 On the new drop-down screen, click and drag over the color you want to make transparent (in this case, the white background), until it turns pink. Now press the Set Transparency button, and the white space around your image is now invisible, and your clipart looks like it belongs on the colored background.
 |
Now, isn't that much better?
|
SMART Board Basic #8
When inserting an object into a Notebook file, the drop-down menu will offer you several options, including locking your object. However, when you scroll to Locking, and then over to the sub-menu, you'll see that you can do any one of three things:
- Lock in Place
- Lock and Allow Move
- Lock and Allow Move and Rotate
In my mind, "Lock and Allow Move" at first seemed to be a bit of an oxymoron, and frankly, quite pointless. That is, until I discovered exactly what that command does.
- Lock in Place, of course, will lock the object so that it cannot accidentally be selected and moved out of place. This is very helpful if you're building a page and using lines, for example, to divide the page into sections. When your students are categorizing the objects on the page, you surely wouldn't want the divider lines to be movable.
- So what's the point of Lock and Allow Move, then? Well, if your students are sorting polygons, deciding which are regular and which aren't for example, you want the objects to be movable, but you need to make sure that the dimensions of each object remain as you intended. That's where this Lock and Allow Move command is helpful. Your students will be able to move the regular pentagon without accidentally changing its shape or size. And, by the way, choosing this locking option also gets rid of the dotted line around each object when selected. It's a small detail, but your file will actually look much nicer while your students are working with it.
- Lock and Allow Move and Rotate, then, becomes essential for a lesson on, let's say, congruent triangles. Congruent triangles must have identical corresponding angle measurements, and congruent corresponding sides. Your students can now move triangles, and rotate them to check that their corresponding angles and sides actually are congruent.
SMART Board Basic #9
One of the things that makes working with a Smart board so advantageous is being able to prepare all of yor visuals in advance, without having to reveal everthying you've prepared all at once. The easiest way to control what is visible on your screen is to use the Screen Shade tool.

Clicking on the screen shade will cover your work area with a gray square, that you can then slide from any direction to reveal small parts of your screen at a time. So handy! Not so attractive¡
Building a page that allows you to reveal only small parts of your screen at a time is easy, though, and looks pretty magical to anyone who doesn't know how it was done. Here's how you can build your own "Slide and Reveal" file.
Think of it as building a sandwich. Your text and your background are the slices of bread. Make sure that both slices are the same color. You will be adding a rectangle to the middle of your sandwich that will slide between the text and background to reveal only one sentence at a time. Take a look at the video below (captured with the Smart Recorder, by the way) to see how it's done. With a little practice, building Slide and Reveal pages becomes a snap. Give it a try. I promise your students will wonder how you did it. Imagine that--getting your students to wonder!
SMART Board Basic #10
Your Smart Notebook software download provides not one, but two methods for recording what you do on your computer: Page Recorder, and Smart Recorder. At first, they may not seem that different, but the fact is that although they are similar, they do have some very significant differences.
The Page Recorder is located in the Properties tab of every Notebook page. This recorder can only be used in Smart Notebook, and will only record the visible changing of the page (in other words, only what you do, not what you say). Once you press stop, the recording is embedded in your Notebook page, and will replay what you just did--your page is no longer just a static image! What an easy way to replay yesterday's lesson for that student who was absent and missed it. Have another student narrate while the lesson is running, and it becomes a nice review activity for everyone.

The Smart Recorder, on the other hand, is like Page Recorder's beefier cousin. While it is accessible through the Smart Notebook application, it can be accessed independently of Notebook as well (check your Applications folder, or use the Spotlight Tool to search for "Recorder"). This means that it can be used to record anything you do on your computer. Smart Recorder will capture what you do on the screen, and your narration as well. Once complete, you have an independent movie file that can be embedded in your class wiki or blog, or . . . yes, even a Notebook file. You can even upload your movie to YouTube or Teacher Tube, or any of the other video sites, so it is available for your students to view again and again if necessary. I really love having my students use this recorder to make movies showing how they solve math problems, for example. Not only do I get to watch what they do, I can hear their explanation, and save the video as an artifact for their portfolio, or for a parent conference.
SMART Board Basic #11

If you've spent any time exploring the Gallery in your Smart Notebook software, you have, no doubt, discovered some pretty handy resources. Not only are there thousands of images to use while creating your lesson masterpieces, and everything from backgrounds to entire lesson pages, there are also loads of interactive gallery items that you will surely learn to love using in your classroom.

One of my favorite interactive gadgets is the Random Word Chooser. Like many teachers, I suppose, I use the Random Word Chooser as a high tech version of the old popsicle sticks with your students' names. Locate the item in the gallery, and use the drop down menu to add it to your Notebook page (or simply drag it from the Gallery onto your page). Select the number of spaces you need (ie the number of students in your class) and type in each student's name. Then, the next time you need to select a student at random (to work at the board, for example), you can have your computer do the dirty work. The best part is, no one will moan and groan and accuse you of playing favorites. Your Smart board begins to take on a Wizard of Oz-type sagacity, and as you know, no one argues with the Great and Powerful Oz.
**Once you've added your class list to the Random Word Chooser, don't forget to drag it into your "My Content" folder in the gallery. It will be ready for you to use any time you need it. And, if you teach several different groups every day, you can create one for each group and store them all in My Content. You may also want to prepare a Random Group Chooser for each class, and store each of those is My Content as well.
SMART Board Basic #12
Can you use the pen tools to write with digital ink? Check!
Can you customize the pen tools using the Properties tab? Check!
Congratulations! You already have all the skills it takes to create an "Erase to Reveal" activity. Let's give it a try.
First you must customize a pen by choosing a color that matches your background--in this example that will be white. Select a pen, and go to the Properties tab to select white, and the largest pen size available. Be sure to select Save Tool Properties at the bottom of the Properties panel. Your pen tool options will have gone from this:
to this.
Now you're ready to design your page. For example, create a page of math problems and include the answers. To make the page self-checking, use your new white pen tool to cover the answers, and make them "disappear." Now when your student has completed his or her work, the correct answer can be revealed by erasing the white ink that you used to hide it.
Just one word of caution, though. If you write your answer using digital ink (the pen) instead of the text tool, make sure you lock the ink in place before covering it with the background color. If you don't, the eraser will remove both the answer and the ink that's covering it.
SMART Board Basic #13
Multitasking. Teachers certainly need to be adept at it, and we need the tools we use to be good at it as well. If you've got SMART Notebook software and its tools installed on your computer, you have a multitasker available with functions you can use long after you close your Notebook file.

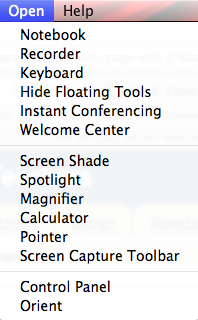 When you open up Board Tools, you won't notice much happen on your screen, until you go to the Open menu and take a look at your options. Even with Notebook yet unopened (or already closed), you have an array of tools available to you for use in whatever program you have on your screen.
 Let's say you're showing your class a web page you currently have open in your browser. You could cover some (or all) of the page with a screen shade, and move it when needed to keep attention focused on a particular part of the page. If the web page you're using is a map, for example, the Spotlight or Magnifier tool would also certainly come in handy for directing the focus of your group. Working in Excel, perhaps? Think about using the Pointer tool the next time you need your students to notice something specific in a particularly tricky formula, . . . you get the idea.
Remembering that you can use your Smart tools independent of Smart Notebook can really be a game-changer in your classroom.
SMART Board Basic #14
Once you feel comfortable using some of the basic tools in Smart Notebook, you may want to start experimenting with creating your own activities, beyond just writing on the board with the digital ink. The Lesson Activity Toolkit is a folder in your Gallery that is a virtual treasure trove of fun, easy to use interactive page elements. Let's begin to explore some of them.
 The first object you'll see in the Tools folder is the Balloon Pop. This element would provide a fun way to allow students to check an answer, or for you to review the "student of the day." Here's how: begin by writing the text that will be hidden by the balloon. Insert the balloon from the Gallery, either by using the drop-down menu, dragging, or double-clicking it. Use the little tab at the bottom right to resize the balloon, and the tab at the bottom left to edit what is written on the balloon. When you're ready to reveal what's underneath, simply touch the image of the balloon and . . . pop! To get the image of the balloon back, click on the balloon's knot to reset.
Start small, with maybe just one balloon on a page. Then, check the Examples folder in the Lesson Activity Toolkit for inspirational ideas of how to use a whole screen full of balloons!
SMART Board Basic #15
 The Gallery Tab in Smart Notebook is full of surprises, but there is frequently new content, and more surprises, that can be added. To be sure you have the most updated content, click on the Gallery tab to reveal the search box at the top. You'll see three small icons at the right of the search box. Clicking on the lower case "a" will reveal the on screen keyboard (which you can also access by pressing the left button on the pen tray). The magnifying glass will activate your search, and the wrench will bring up a menu that includes Check for Updates. Here you'll be able to download the newest materials for the Gallery Essentials folder and the Lesson Activity Toolkit. It's a good idea to check periodically to be sure you get all of the available goodies.
 If you're new to exploring the Gallery, try searching for "timer." Just about every teacher I know could make use of a timer in his or her classroom on occasion, and Notebook has a fun one. Click the arrows on the right side of the circle to access options beyond just setting the time. Here you'll be able to select exactly what you'd like to happen when the set time is up. You can advance to the next page in your file, or go back to the previous page. You could make the timer disappear when time is up, or have it automatically add an image or some custom text to your page. Along with being able to select the timer's sound, these options allow you to turn silent reading time, for example, into something almost magical.
SMART Board Basic #16
In this activity, we'll use a clever color trick to create some educational magic! As you take a look at the following directions, keep in mind that whenever the color of your text matches the color of your background, the text will seem to disappear. No surprise there, right? Now take a look at the surprising activities your can create using this simple strategy.
Follow these easy steps to create a "Magic Tunnel" activity.
SMART Board Basic # 17
Let's continue to play with color tricks, and create a fun magnifying glass activity.
This magnifier illusion would make a wonderful sorting activity. Have your students search for words hidden in the background, and when found, drag to the appropriate designated area of the screen. Imagine a lesson on food chains, for example. Your student could represent a giraffe (or your favorite herbivore) and search for foods that it could eat. This technique promises to make any lesson a little more interesting, don't you think?
SMART Board Basic #18
If you're accustomed to working with tables in your favorite word processor, you may at first find that working with tables in Notebook is a little frustrating (at least I found that). While creating a table is much the same as in Word, for example, resizing the table and/or the cells to suit your needs requires a little finesse.

The bubble in the lower right hand corner of the table allows you to resize the whole table in proportion, but it will not allow you to change the proportions. To make the entire table longer, for example, without making it proportionally wider, use the select tool to "grab" the bottom edge of the table and drag it as far down as you need. The bottom row of cells will get extra long, while the other cells will remain the original size. Now, marquis-select (click and drag over) the whole table and use the drop-down menu to adjust (equalize) the size of the cells. Should you need to merge or divide a cell, right click (or control-click on a Mac) on the cell and choose the appropriate option from the menu that appears. Need to move the entire table without changing the size? Marquis select and use the square in the upper left hand corner to drag the table to a new spot in your workspace.
It's important to remember that you can change the properties of the entire table all at once, or each individual cell separately. Likewise, you can cover each cell of the table with screen shades all at once, or right click to select and shade an individual cell only. Also, be aware that images dragged into a table cell will automatically be resized to fit the cell, while text dragged in will cause the cell to change size to accommodate the text. Want your text to fit perfectly? Just click in the cell and begin to type. Each cell is a text box in disguise, and can be formatted as such.
It may take a little patience to get used to the idiosyncrasies of Notebook tables, but I'm sure once you master the basics, you'll find loads of useful applications for this adaptable tool.
SMART Board Basic #19
Just the other day, I heard a fellow teacher mention that she needs another computer in her room, because when she's using her present computer to display something on her SMART board (like a video, for example) she then can't take advantage of the time that her students are busy to catch up on some other computer project (like returning a parent email). It wasn't until that very moment that I realized most teachers probably don't know how to use the dual display capability of their computer to work with two different screens at the same time. This is such a useful feature, that I now wonder why it isn't one of the first things that mentioned by the sales person when you purchase your SMART board. In any case, this is easy to do, and will most certainly help you to maximize your time--and save your school the expense of buying you another computer!
SMART Board Basic #20
Have you downloaded the latest version of SMART Notebook software yet? Notebook 11 has some very nice new features that deserve your consideration. Let's take a look at a few.
- You now have the ability to insert a live web page right into your Notebook file. Use the Insert menu and scroll to Web Browser. Once in your file, you can navigate to any web page by typing in the URL at the bottom of the browser window. Now you can interact with the web page in the same way you would any other Notebook object. Want to come back to the same web page the next time you open your file? Be sure to pin it to the page!
- You will notice a redesigned toolbar in Notebook 11. You can customize it as you did before, but now when you select a tool, the changeable properties will appear right beside it on the toolbar. Pretty handy, right?
- Speaking of the Properties tab, you can now change the properties of the creative pen tool so that you can turn any shape or image into a creative pen. Remember that if you click and drag the creative pen tool you will get a line of images, but if you simply click your mouse, you can use the creative pen as a stamper as well.
- One of the nicest new features is the Activity Builder. This tool is located in a tab, just below the Properties tab on the side of your screen. Here's how it works. Add several shapes or images to your screen, and decide which will be the "target" object. For example, if I want to construct an activity to sort equivalent fractions, my target object may be a basket into which the correct answers will be deposited. With your target object selected, click on the Activity Builder tab, and press Edit. Your target object will now, temporarily, be covered with a lined pattern. Now drag all of the correct fractions into the top box, and the incorrect ones into the bottom. Then click the Settings button to select the action that will be applied to all correct and incorrect answers, and press Done. That's it! You activity is now ready for your class.
SMART Board Basic #21
Are you familiar with the website Voki.com? This site will let you design a talking avatar that you can embed in a blog or wiki. And, with the release of SMART Notebook 11, you can now add your talking avatar to a Notebook page as well.
Start by going to the SMART Exchange website (http://exchange.smarttech.com), search for Voki widget and download. Now, open a Notebook file, go to "My Content" in the Gallery and use the drop down menu to select "Add to My Content." Navigate to your Downloads file and select the Voki download. Once added to your "My Content" folder, you can drag the Voki placeholder into your Notebook page.
Then, log into your account (it's free to create if you don't already have one) at http://voki.com and follow the simple directions to create your talking avatar. When complete, copy the embed code and paste into the Voki placeholder in your Notebook page. Within a few seconds, your avatar will be ready to speak right from your Notebook file. (Be sure to notice how the avatar's eyes follow your mouse movements. So cool!)

SMART Board Basic #22
Is there any student who doesn't love to work on the SMART Board? Newer boards allow two students to work at the same time, and SMART Tables allow even more. Even so, most of the students in your class spend more time waiting than working . . . unless, of course, you use the Extreme Collaboration Add-On for SMART Notebook.
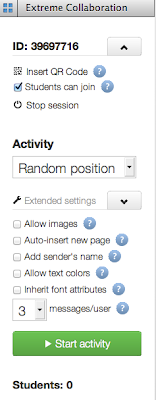 Extreme Collaboration allows you to create an activity in which all students can participate at the same time. Start by downloading the add-on from http://www.extreme-collaboration.com. Once installed, you'll find the Extreme Collaboration icon in the add-ons tab (the one that looks like a puzzle piece) on the side of your Notebook file. After pressing Connect, you can Start the Activity, and then customize the settings. You will be able to have your students join the activity anonymously, by signing in, or by selecting their names (if you log in and upload a class list ahead of time).
Now just pose a question, and all of your students can contribute an answer by logging on to http://www.add2nb.com. They will enter the session ID that you provide, and when they submit a response, it will immediately appear on your SMART Notebook page.
You can choose to have the answers appear randomly on the screen, or in categories. Allow your students to submit written responses or uploaded images, and from 1 to 10 responses per activity. Choose to display each student's name along with his/her answer, or display answers only. (Even if you don't display student names, you'll still be able to see which answers came from which students, if you choose, by clicking on each student's name from the list that will appear under the green "Start Activity" button shown in the image to the left.)
Once you get the hang of using this add-on (which won't take long), you'll find countless ways of incorporating Extreme Collaboration into your lessons, and love it each and every time. Use it for brainstorming, or as a way to collect "exit tickets." Or, use it as I recently did, as a really cool, easy way to have students from different grades in different buildings vote in a school election at different times of the day. Sure, there may have been a better application for online voting, but it certainly allowed me to test the "extreme" of Extreme Collaboration. Watching votes appear on my board as they were submitted from the far reaches of our campus proved to me that Extreme Collaboration passed its test with flying colors!

